Inventory and Item List

- Item List
 To Setup rentals in TSP, you must first have an item setup in QuickBooks to use as a place holder for the rented piece of equipment. To do this, in QuickBooks, Click on Lists on the top menu then select Item List.
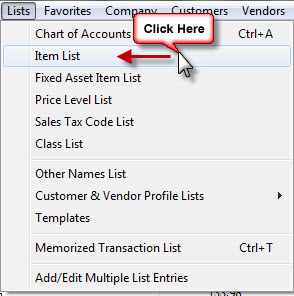
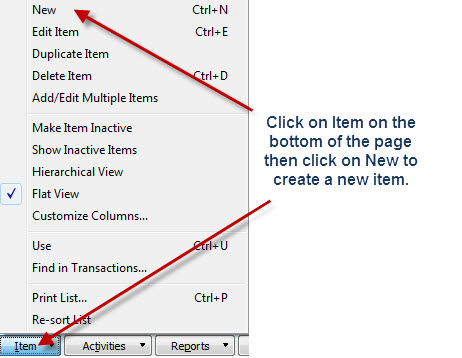
 Then we need to create a new item so at the bottom of the Item List, Click on Item and then New towards the top of the menu.
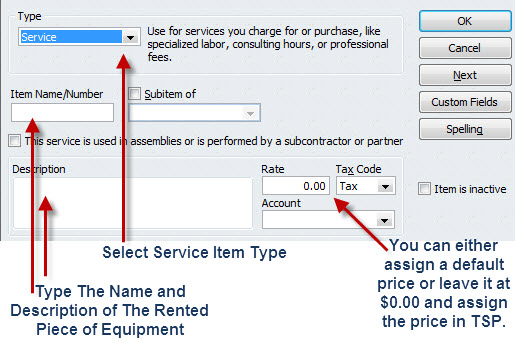
 Create a new service item just like I have using the picture below as a guide.
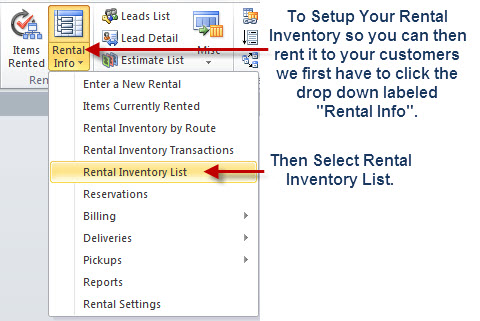
 Now let’s go into The Service Program. Make sure you update your inventory from QuickBooks so we can use the newly created line items. Once in TSP, click on the Rental Info Drop Down and then select Rental Inventory List to setup our rented equipment.
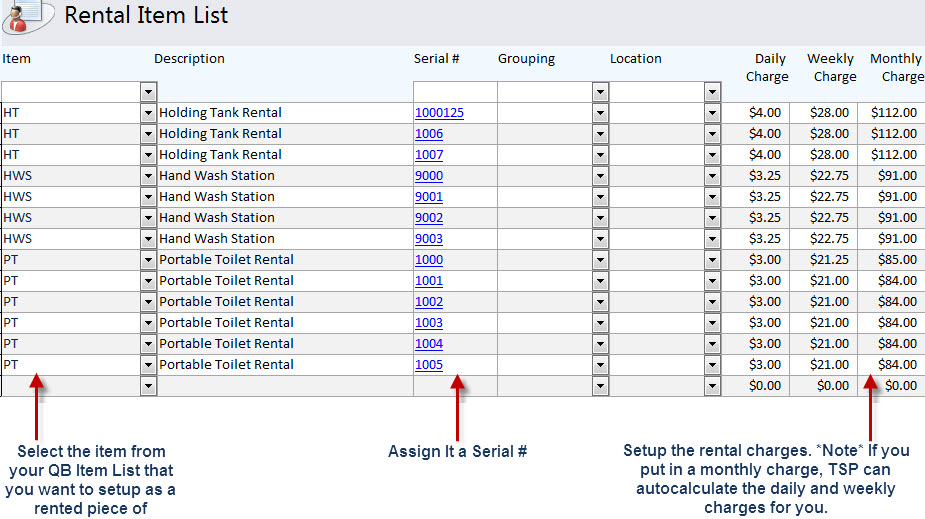
 Create your physical rental inventory on this screen. We need to select the item we created in QuickBooks, give the unit a serial number and then set its Daily, Weekly and Monthly Charges.
 Once you have setup the inventory you have to rent out. You can close this page by click Close in the top right corner.
- Tracking Inventory
- Setting up "On Truck/Wharehouse" Inventory
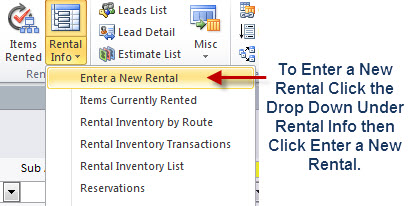
To create a new Rental Transaction (invoice), click on the Rental Info Button on the top menu and then select enter a new rental.
 We will use the Rental Transaction screen as the main screen when setting up new rentals and managing existing ones. Use the picture below to help guide you through creating a new rental transaction.
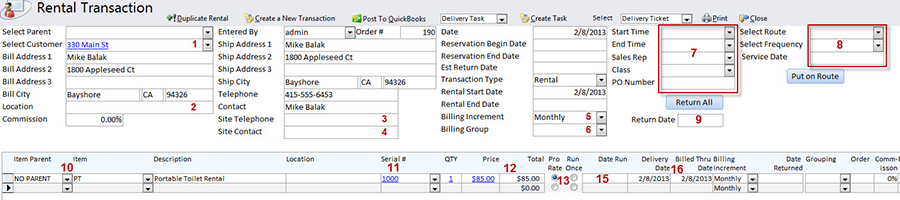
1). Select the customer you are creating the rental for.
2). Use the location field to notate where this unit is located/dropped (example: front office break room, 2nd floor lobby…etc.)
Fields 3 and 4 give you extra space to record additional contact info for the client you are renting to; such as a Site Foreman or Property Manager.
5). Use the Billing Increment to control whether this unit is billed Monthly, Weekly…etc.
6). The Billing Group drop down can be used to control different billing scenarios. We can have a billing group labeled Monthly for regular rentals and possibly even one called yearly for customers that prepay the rented amount and only want 1 invoice per year…etc.
7). These fields are used to track info for this rental transaction such as start time, end time Sales Rep and Class.
8). We can use the fields in section 8 to automatically add a rented item onto a route for either service or delivery/pickup.
9). Put a date in this field and press return all to have all rented items on the transaction marked as returned. You will then be prompted to Invoice this now, either press yes or no. Pressing Yes will automatically close the transaction and stick the billing entries onto the next batch. Press NO will allow you to post/bill for this unit separately without having to wait for you to run your next billing batch.
10). Select the item being rented.
11). Select the serial number of the rented item or leave it blank if you don’t track/use serial numbers.
12). Set the monthly rate for this rented unit. It will auto populate using a units monthly charge if a units serial number is selected that has their monthly rate setup on the rental inventory list covered earlier in this guide.
13). Select whether you want this unit to be prorated or not as well as if this charge should only be run once. For one time charges (i.e. delivery/pickup, fuel surcharge, service charge) you can tell the software only to “Run Once” and it will not be included in future billing batches. The date that a Run Once item was billed for is displayed in the field marked 15.
16). These are probably 2 of the most important fields on the rental transaction. The delivery date and billed through date control most of the rental charges. Every time you run a billing batch, all your rentals are billed from their billed through date until the end date you select on the Run Billing Screen which is covered in the next step of the rental guide. You can use the billed through date to control whether a unit has been prepaid until a certain date, it also allows you to bill for units in advance at the time of rental just by adjusting the date to the end date of your billing cycle when creating a new rental.
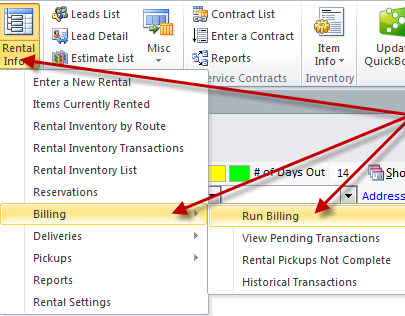
To run a batch billing of all our rented items we need to get to the “Run Billing” screen. To do so, follow the picture below by clicking Rental Info, then Billing and finally Run Billing.
 To generate our billing batch follow the steps outlined in the picture below.
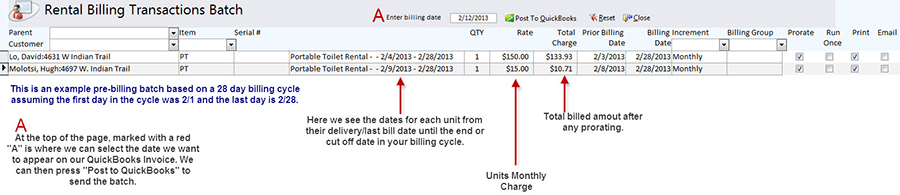
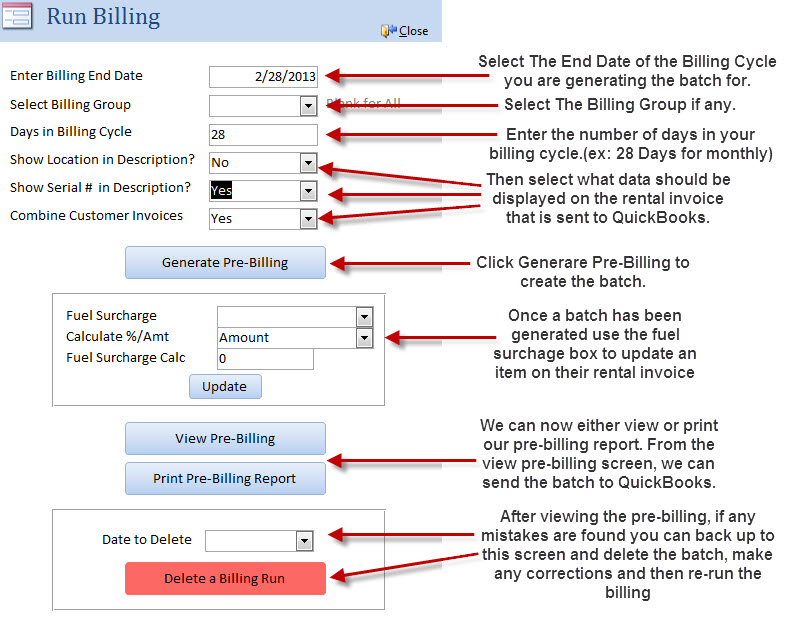 Once you have generated the pre-billing report click view pre-billing to send this batch to QuickBooks as shown below.